Wednesday, April 10, 2013

Protect your art career


This video really made an impact on the way I see art and how we all affect the industry as artists when we undervalue our work. His name is Stephen Silver and he has something you should hear.

Value your work, don't give away your work for free. If we don't start doing it, things won't change.


Please spread the word.

Monday, April 8, 2013

Batcave full process


Hey there guys. This time I'll take you through the process on creating my version of the Batcave from scratch to final colors.

1. Sketch. First of all I did a 2x2" thumbnail of the batcave just to get an idea of what I wanted.
Sketch
2. Building perspective. After I scanned the thumbnail, I used Manga Studio Ex 4 software to create a grid on which my perspective lines would lie, and created a background architecture for the cave.
Manga Studio Ex 4

Background architecture

3. Blue line printing. Once I had the perspective lines and the grids in place, I printed a blue line penciled version of the whole thing on an 11x17  comic book bristol paper. I have a Brother Printer that prints to size. It's really cool, I recommend it 100% it is a very good investment.

This is the penciled version on top of the blue line.

Pencils on bristol
This is the scanned version of the pencils.

4. Inks.


5. Coloring

A) Flats
Using Photoshop CS5 I flatted all the figures in the piece. This is called Flats stage. This helps you to make selecting everything instantly. Be sure to keep a separate layer with the flats.

B) Rendering
Once I have picked up the base colors, I start using different techniques to color or "render" the drawing.


Here is a video showing the process http://youtu.be/c7pJPrv8_LE


 That's it! Questions or comments are welcomed.


Saturday, April 6, 2013

Batman vs. Predator pages

This assignment was a really cool assignment our first one actually of the semester. It holds a special place for me because of personal reasons (read here) but let's get to it.

First the thumbnails. This is actually the most difficult part, since this is where the storytelling comes alive. After coming up with some decent layouts I proceed to do the digital roughs on a Wacom Intuos 3 for both pages.

It is very important to always, always look for reference pictures, specially if its something you have no idea what it looks like or in this case, a city such as Gotham City. The city is a character on its own so you can't just draw New York, you have to draw Gotham.
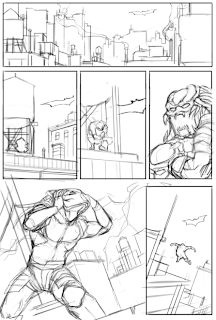
Roughs 2nd page


The next step is to print them full size in blue lines, this way I can do the pencils on the actual page. I used to do the light box thing, but this is just more convenient, since it saves me 1 step.


This time I tried some sound effects on the actual page instead of letting the letterer do the job. I did some sketches first.


Final stage is the inking stage, which I have to practice much more by the way. I experimented a lot on this pages, specially on the first one. I learned a thing or two.

 That's it! Piece of cake right?

All comments are welcome and encouraged. See you next time!